What Is Autoclaved Aerated Concrete

If you’re in the construction industry or exploring building material business opportunities, you’ve likely heard of autoclaved aerated concrete (AAC). This innovative, eco-friendly material has revolutionized modern construction—offering unmatched benefits for residential, commercial, and infrastructure projects worldwide. But what exactly is autoclaved aerated concrete, and why is it becoming the top choice for builders, investors, and governments pushing for sustainable development? This guide breaks down everything you need to know, from its composition and manufacturing process to its key advantages, applications, and why investing in an AAC block production line is a profitable venture.
Autoclaved Aerated Concrete

What Is Autoclaved Aerated Concrete (AAC)?

Autoclaved aerated concrete (AAC) is a lightweight, precast building material made from natural and industrial by-products. It’s created by mixing cement, lime, sand, fly ash (or other pozzolanic materials), water, and a foaming agent (typically aluminum powder). The mixture undergoes a chemical reaction that releases hydrogen gas, creating millions of tiny air bubbles—giving AAC its signature porous structure. After casting and initial setting, the material is cured in high-pressure autoclaves (hence the name “autoclaved”) at temperatures around 180°C and pressures of 10–12 bar, which strengthens the concrete through crystallization.
The result? A building material that’s 60–70% lighter than traditional concrete blocks, yet boasts impressive structural strength, thermal insulation, and fire resistance. AAC is most commonly produced as blocks, panels, or lintels, but can also be customized for specific project needs—making it versatile for diverse construction applications.

Key Composition of AAC: Eco-Friendly & Cost-Effective

One of the biggest draws of AAC is its sustainable, cost-efficient composition. Unlike traditional clay bricks or concrete blocks that rely on scarce resources, AAC leverages industrial waste and abundant raw materials:
  • Cement & Lime: Provide binding properties and strength.
  • Fly Ash/Sand: Fly ash (a by-product of coal-fired power plants) or sand serves as the main aggregate, reducing waste and lowering raw material costs.
  • Aluminum Powder: Acts as a foaming agent, creating the aerated structure that makes AAC lightweight.
  • Water: Activates the chemical reaction between ingredients.
This composition not only makes AAC an eco-friendly choice (reducing carbon footprint by up to 30% vs. traditional concrete) but also keeps production costs low—especially for investors using local raw materials (e.g., fly ash in India, sand in Southeast Asia). For entrepreneurs, this means an AAC block manufacturing plant can achieve higher profit margins while aligning with global sustainability goals.

How Is AAC Manufactured? (Simplified Process)

AAC production is a streamlined, scalable process—ideal for both small-scale startups and large industrial operations. Here’s a quick overview of the core steps in an AAC block production line:
  1. Raw Material Preparation: Cement, lime, sand, and fly ash are crushed, ground, and stored in silos for precise batching.
  2. Mixing & Foaming: Ingredients are weighed and mixed with water to form a slurry. Aluminum powder is added, triggering gas formation.
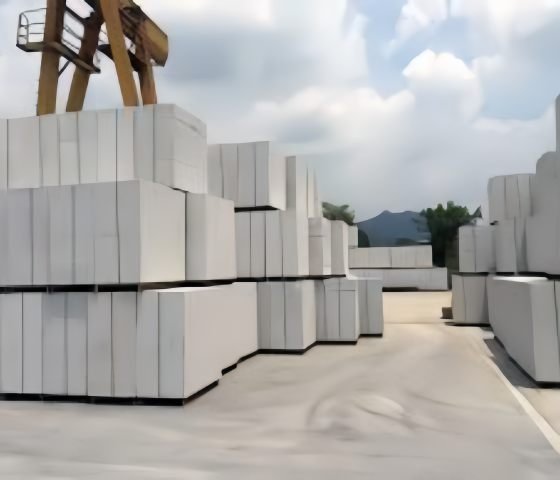
  3. Casting & Rising: The slurry is poured into molds, where it expands to 2–3 times its volume as gas bubbles form. It sets into a solid, porous cake.
  4. Cutting: The solidified cake is cut into standard or custom-sized blocks/panels using wire cutting machines for precision.
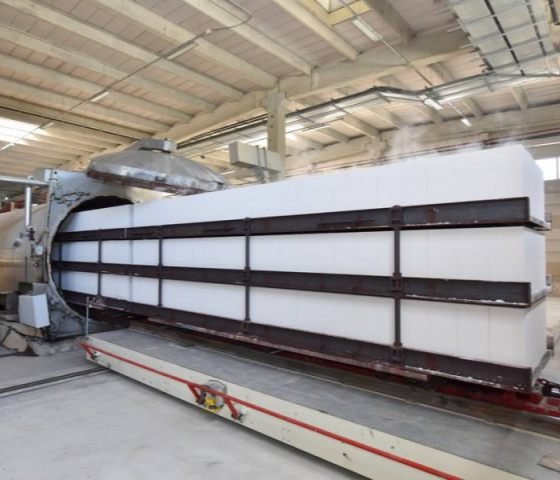
  5. Autoclaving: The cut pieces are cured in autoclaves for 8–12 hours, strengthening the material and enhancing its properties.
  6. Packaging & Delivery: Finished AAC blocks are inspected, stacked, and packaged for transportation to construction sites.
The process is highly automated, with modern AAC block making plants offering capacities ranging from 30,000 to 600,000 m³/year—perfect for investors targeting local markets (mini plants) or national/export markets (large-scale lines).
Autoclaved Aerated Concrete for sale

Why Choose AAC? Key Benefits for Builders & Investors

AAC’s growing popularity stems from its unmatched combination of performance, sustainability, and cost savings—addressing the top concerns of builders and investors alike:

1. Lightweight & Easy to Install

AAC blocks weigh just 500–700 kg/m³ (vs. 2400 kg/m³ for traditional concrete blocks), reducing structural load on buildings. This makes transportation easier (cutting logistics costs by 30%) and speeds up construction—labor teams can lay 2–3 times more AAC blocks per day than clay bricks. For builders, this translates to faster project completion and lower labor costs.

2. Superior Thermal & Sound Insulation

AAC’s porous structure traps air, providing excellent thermal insulation (thermal conductivity of 0.12–0.18 W/mK). This cuts heating and cooling costs for buildings by 25–40%—a major selling point for homeowners and commercial clients amid rising energy prices. It also offers sound insulation (45–55 dB), creating quieter interiors—ideal for residential complexes, offices, and schools.

3. Fire & Seismic Resistance

AAC is non-combustible and can withstand temperatures up to 1,200°C for 2–4 hours, making it a safe choice for fire-prone regions. Its lightweight, flexible structure also performs well in seismic zones (e.g., India, Indonesia, Turkey), absorbing shock and reducing building damage during earthquakes—aligning with government safety regulations.

4. Eco-Friendly & Sustainable

AAC uses 30–50% industrial by-products (fly ash, slag), reducing landfill waste. Its production consumes 60% less energy than clay brick manufacturing, and it’s 100% recyclable. With governments worldwide imposing bans on clay bricks (e.g., Pakistan, India, Nigeria) to protect soil resources, AAC is becoming a mandatory choice for sustainable construction—driving demand for AAC block production lines.

5. Cost-Effective in the Long Run

While AAC blocks may have a slightly higher upfront cost than clay bricks, their installation speed, energy savings, and durability (50+ year lifespan) result in lower total lifecycle costs. For investors, this means steady demand—especially as more projects adopt green building certifications (LEED, BREEAM).

AAC Applications: Versatile for Every Project

AAC’s versatility makes it suitable for a wide range of construction applications:
  • Residential Buildings: Walls, partitions, and floors for houses, apartments, and townships (e.g., affordable housing projects under Pakistan’s Naya Pakistan Housing Program).
  • Commercial Structures: Offices, shopping malls, and hotels—where thermal efficiency and quick construction are critical.
  • Infrastructure Projects: Roads, bridges, and power plants (CPEC projects in Pakistan, highways in India) due to its seismic and durability benefits.
  • Industrial Facilities: Warehouses and factories—lightweight yet strong enough to support heavy loads.
  • Renovations: Ideal for retrofitting old buildings, as its lightweight structure doesn’t require additional structural support.

Why Invest in an AAC Block Production Line?

For entrepreneurs and investors, the rising demand for AAC presents a lucrative opportunity. Here’s why an AAC block manufacturing plant is a smart business move:
  • Booming Demand: The global AAC market is projected to grow at 8.2% CAGR (2023–2030), reaching $28.7 billion by 2030 (Grand View Research). Key drivers include urbanization, housing shortages, and sustainability policies.
  • Low Competition in Emerging Markets: Countries like Nigeria, Kenya, Vietnam, and Sri Lanka have high demand for AAC but limited local production—creating gaps for new investors.
  • Scalable & Profitable: Mini AAC plants (30,000–100,000 m³/year) require low upfront investment ($100k–$1M) with ROI in 12–24 months. Large-scale lines (200k+ m³/year) cater to national markets and exports, generating annual profits of $500k+.
  • Government Incentives: Many countries offer tax breaks, subsidies, and low-interest loans for eco-friendly manufacturing (e.g., India’s Production-Linked Incentive Scheme, EU’s Green Deal).

Final Thoughts: AAC Is the Future of Construction

Autoclaved aerated concrete isn’t just a trend—it’s a sustainable, high-performance material that’s reshaping the construction industry. Whether you’re a builder looking to improve project efficiency or an investor seeking a profitable, future-proof business, AAC offers endless possibilities.
If you’re ready to tap into this growing market, partnering with a trusted AAC block production line manufacturer is key. We offer turnkey solutions tailored to your local market—from raw material testing and plant design to installation, training, and after-sales support. Our plants are customizable for capacities 30,000–600,000 m³/year, ensuring you get the perfect setup for your budget and goals. Visit aacblockmanufacturingplant.com to learn more.

Are Ultrasonic Retainer Cleaners Safe

If you wear a retainer, you know how crucial it is to keep it clean. A dirty retainer can harbor bacteria, cause bad breath, and even lead to oral health issues. In recent years, ultrasonic retainer cleaners have gained popularity as a convenient and effective way to clean these dental devices. But a common question lingers: are ultrasonic retainer cleaners safe? Let’s dive into the details to help you make an informed decision.​

Understanding How Ultrasonic Retainer Cleaners Work​

Before we assess their safety, it’s important to understand how ultrasonic retainer cleaners function. These devices use ultrasonic waves—high-frequency sound waves beyond the range of human hearing—to create tiny bubbles in a cleaning solution through a process called cavitation. As these bubbles implode, they generate powerful micro-jets of liquid that dislodge dirt, plaque, bacteria, and food particles from the surface and hard-to-reach areas of your retainer.​
Most ultrasonic cleaners designed for retainers operate at frequencies between 20,000 and 45,000 Hz. This range is considered effective for cleaning without being overly aggressive. The cleaning cycle typically lasts anywhere from 3 to 10 minutes, depending on the model and the level of dirt on the retainer.​

The Safety of Ultrasonic Cleaners for Different Retainer Materials​

One of the primary concerns about ultrasonic retainer cleaners is whether they can damage the retainer itself. Retainers are made from various materials, and their compatibility with ultrasonic cleaning varies:​

  • Acrylic Retainers: These are among the most common types of retainers. Acrylic is generally durable, and ultrasonic cleaners are safe for acrylic retainers when used as directed. The gentle yet effective cleaning action removes buildup without scratching or weakening the material. However, it’s important to avoid using harsh cleaning solutions that could degrade the acrylic over time.​
  • Wire Retainers (Hawley Retainers): Hawley retainers consist of an acrylic base with metal wires. The metal components are typically made from stainless steel or nickel-titanium, both of which are resistant to corrosion and damage from ultrasonic waves. The key is to ensure the wires are securely attached to the acrylic before cleaning—loose wires may become more dislodged, but this is a rare occurrence if the cleaner is used properly.​
  • Clear Plastic Retainers (Essix Retainers): Clear plastic retainers are thin and can be more delicate than acrylic or wire retainers. When used correctly, ultrasonic cleaners are safe for Essix retainers. However, prolonged exposure to high-frequency waves or using a cleaner with too high a frequency could potentially cause the plastic to become brittle over time. It’s best to follow the manufacturer’s guidelines for cleaning time and frequency.​
  • Lingual Retainers: These are permanently bonded to the back of the teeth, so they aren’t removed for cleaning. As a result, they don’t require ultrasonic cleaning, but if you have a removable retainer in addition to a lingual one, the same safety considerations apply as with other removable types.​

In general, most retainer manufacturers approve of ultrasonic cleaning when used as instructed. However, if you’re unsure about your specific retainer, it’s always a good idea to check with your orthodontist.​

Potential Risks and How to Mitigate Them​

While ultrasonic retainer cleaners are generally safe, there are some potential risks to be aware of, along with steps to mitigate them:​

  • Damage from Over-Cleaning: Leaving your retainer in the ultrasonic cleaner for too long can increase the risk of damage, especially for delicate materials like clear plastic. Follow the recommended cleaning time—usually 3 to 5 minutes for regular cleaning. Avoid running multiple cycles in a row unless the retainer is extremely dirty, and even then, take short breaks between cycles.​
  • Harmful Cleaning Solutions: Some people make the mistake of using harsh chemicals like bleach, alcohol, or abrasive cleaners in their ultrasonic devices. These substances can damage the retainer material and may leave residue that’s harmful if ingested. Instead, use a mild, pH-neutral denture or retainer cleaning solution, or simply warm water with a small amount of gentle dish soap. Many ultrasonic cleaner manufacturers also sell specialized cleaning tablets designed for use with their devices.​
  • Cross-Contamination: If you use the ultrasonic cleaner for other items (like jewelry or dentures) in addition to your retainer, there’s a risk of cross-contamination. Bacteria from other items can transfer to your retainer, and vice versa. To avoid this, clean the ultrasonic tank thoroughly between uses, and consider designating the cleaner solely for your retainer if possible.​
  • Loosening of Components: For retainers with attached parts (like wires or clasps), the vibrations from the ultrasonic cleaner could potentially loosen these components over time, especially if they’re already worn or damaged. Inspect your retainer regularly for signs of wear, and if you notice any loose parts, stop using the ultrasonic cleaner and consult your orthodontist.​

Impact on Oral Health: Is There a Risk?​

Another concern is whether ultrasonic cleaning could pose a risk to your oral health. The good news is that when used properly, ultrasonic retainer cleaners are not harmful to your mouth. In fact, they can improve oral health by effectively removing bacteria and plaque that might otherwise cause gum irritation, cavities, or bad breath.​

The cleaning solution used in the ultrasonic cleaner is a key factor here. Avoid using solutions that contain harsh chemicals, as they can irritate the gums or cause an unpleasant taste. After cleaning, always rinse your retainer thoroughly with warm water to remove any remaining cleaning solution before placing it back in your mouth.​

There’s no evidence to suggest that the ultrasonic waves themselves have any negative impact on oral tissues. The waves are contained within the cleaning tank and do not come into contact with your mouth during the cleaning process.​

Comparing Ultrasonic Cleaners to Other Cleaning Methods​

To put the safety of ultrasonic retainers into perspective, let’s compare them to other common retainer cleaning methods:​

  • Brushing with Toothpaste: While brushing is a simple and effective method, using regular toothpaste can be abrasive and may scratch the surface of your retainer over time, creating tiny crevices where bacteria can hide. Ultrasonic cleaners, on the other hand, clean without abrasion.​
  • Soaking in Mouthwash: Some people soak their retainers in mouthwash, but many mouthwashes contain alcohol or other chemicals that can damage retainer materials, especially with repeated use. Ultrasonic cleaning with a mild solution is gentler.​
  • Denture Tablets: These are a popular alternative to ultrasonic cleaners. They work by releasing chemicals that dissolve plaque and kill bacteria. However, they may not be as effective at reaching deep crevices as ultrasonic waves. Also, some tablets contain bleach, which can discolor retainers.​
  • UV-Cleaning Devices: UV cleaners use ultraviolet light to kill bacteria. While they’re effective at disinfection, they don’t remove physical debris like plaque or food particles. Ultrasonic cleaners, by contrast, remove both debris and bacteria, making them a more comprehensive cleaning solution.​

When compared to these methods, ultrasonic cleaners stand out for their effectiveness and safety when used correctly.​

Tips for Safe and Effective Use of Ultrasonic Retainer Cleaners​

To ensure you get the most out of your ultrasonic retainer cleaner while keeping it safe, follow these tips:​

Read the Manufacturer’s Instructions: Every ultrasonic cleaner is slightly different, so familiarize yourself with the specific guidelines for your model, including recommended frequency, cleaning time, and compatible cleaning solutions.​

Use the Right Solution: Stick to mild, retainer-safe cleaning solutions. Avoid bleach, alcohol, and abrasive cleaners. If you’re unsure, opt for warm water with a drop of gentle dish soap.​

Don’t Overdo It: Clean your retainer with the ultrasonic cleaner 2-3 times a week for regular maintenance. Daily cleaning with a soft toothbrush and mild soap is usually sufficient, with ultrasonic cleaning as a deeper clean.​

Inspect Your Retainer Regularly: Check for signs of damage like cracks, chips, or loose wires before and after each ultrasonic cleaning. If you notice any issues, stop using the cleaner and contact your orthodontist.​

Clean the Ultrasonic Tank: After each use, empty the cleaning solution, rinse the tank with warm water, and wipe it dry to prevent the buildup of bacteria or mineral deposits.​

Store Your Retainer Properly: When not in use, keep your retainer in a clean, dry case to prevent contamination. Avoid leaving it in direct sunlight or hot environments, as heat can warp the material.​

Expert Opinions: What Dentists and Orthodontists Say​

Most dental professionals agree that ultrasonic retainer cleaners are safe when used appropriately. Dr. Sarah Johnson, a practicing orthodontist with over 15 years of experience, notes, “I often recommend ultrasonic cleaners to my patients because they do a great job of removing plaque and bacteria from hard-to-reach areas. The key is to use them as directed—don’t over-clean, and use a gentle cleaning solution. In my practice, I’ve rarely seen damage to retainers from ultrasonic cleaners when patients follow the guidelines.”​

Dr. Michael Chen, a dentist who specializes in preventive care, adds, “Ultrasonic cleaning is a safe and effective method for maintaining retainers. It’s much more thorough than brushing alone, which can help prevent oral health issues down the line. As long as patients are careful not to use harsh chemicals and don’t leave the retainer in too long, there’s little risk of damage.”​

Conclusion: Are Ultrasonic Retainer Cleaners Safe?​

After examining the evidence, it’s clear that ultrasonic retainer cleaners are safe for most retainers when used correctly. They provide a thorough clean that helps maintain both the retainer’s condition and your oral health. The key factors to ensure safety are: using the right cleaning solution, following the recommended cleaning time, inspecting your retainer regularly for damage, and avoiding over-use.​
As with any dental care product, it’s important to use common sense and consult your orthodontist if you have any concerns about your specific retainer. With proper use, an ultrasonic retainer cleaner can be a valuable tool in keeping your retainer clean, your mouth healthy, and your smile bright.…

Fry Daddy: The Oil-Saving Dynamo in Everyday Moments

The kitchen hums with the faint scent of frying oil on a Saturday morning. Mom stands over the Fry Daddy, dropping tater tots into the hot oil. Once, a single batch of fries would guzzle half a bottle of oil—now, just 4 cups barely coat the bottom, yet the golden tots bubble merrily. Five minutes later, she scoops them out, sprinkles on some salt, and hands them to her kids. The crisp crunch mingles with laughter, capturing Fry Daddy’s magic: frying up joy without wasting a drop.

Fry Daddy Rush-Hour Breakfast Hacks

presto fry daddy

When the alarm blares for the third time, Lisa, a busy commuter, leaps out of bed. She yanks open the fridge—marinated chicken tenders and frozen egg rolls wait patiently. She pours 4 cups of oil into the Fry Daddy, plugs it in, and bolts to the bathroom. By the time she’s brushed her teeth, the oil shimmers with tiny bubbles, ready to cook.
She dips the chicken in beaten egg and drops it in; the oil sputters softly, no splatters on the counter. Eight minutes later, crispy tenders and golden egg rolls fill her plate. Lisa glances at the half-full oil reservoir, snaps on the lid, and tucks the fryer into the cabinet. “Healthier than takeout, cheaper than a diner run,” she mutters, biting into a tender as she sprints to catch the bus. This A4-sized wonder fits perfectly into city life—no messy oil changes, no constant temperature checks, just restaurant-worthy fried food in 30 minutes flat.

Guilt-Free Girls’ Night Snacks

“One more batch of onion rings!” echoes from the living room. Jenny grins and lifts the Fry Daddy’s lid. Over three hours, this little workhorse has cranked out chicken nuggets, calamari, and fried pickles, yet the oil stays crystal clear. “Back in the day, my big fryer swallowed oil like a tank—enough to buy a steak dinner. Leftover oil? Tossing it felt criminal; keeping it felt risky,” she says, scooping out the rings with the handy built-in spoon. “But this thing? Uses so little, and you can reuse it for weeks. Tonight’s spread cost less than ordering apps!”
The coffee table overflows with colorful plates, but no one notices the Fry Daddy tucked in the kitchen corner. No clunky hardware, no smoke clouds—just a quiet sidekick handling all the frying, letting the hostess join the fun.

Fry Daddy Picky Eater Solutions for Busy Parents

Every mom knows the struggle of a fussy kid. Sarah tried steaming, boiling, roasting—nothing worked until she met Fry Daddy. She dips carrot sticks in a light batter and lowers them into the warm oil. Watching the orange sticks turn golden, her son, who once fled at the sight of veggies, reaches out eagerly.(Top 10 healthy meals for kids)
“I worried about using too much oil, but this fryer’s a miser,” Sarah says, wiping the ceramic non-stick interior with a restaurant wipes. “Old fryers turned the kitchen into a war zone. Now? A quick rinse and it’s spotless. And that steady temperature? Carrots stay tender inside, crispy outside—he even asks for broccoli now!” The lid clicks shut softly, as if promising: “Pancakes tomorrow, same oil, no problem.”

Late-Night Solo Comfort Food

fry daddy

It’s 10 PM, and Mike, a programmer, pulls the last cod fillet from the fridge. He loves his Fry Daddy for late snacks—not just for the food, but the soothing sizzle, a white noise for stressed-out minds. He dusts the cod in flour, drops it in, and the blue indicator light winks: “I’ve got this.”
By the time the fish turns golden, the city skyline glows outside. Mike pours a beer, eyeing the oil—only a third used. This little fryer gets solo life: no need for a cluttered kitchen, no angst over leftover oil. Eating well alone, he realizes, doesn’t have to be complicated.
From dawn till dusk, for one or for a crowd, Fry Daddy fits like a member of the family—turning oil conservation into second nature. No fancy jargon, just “4 cups for 4 people” practicality and “reuse without waste” smarts. Because the best kitchen tools don’t make life harder—they make it crispier, simpler, and a whole lot tastier. Take that first crunchy bite, and you’ll get it: some joys really don’t need a gallon of oil.

Henckels Self Sharpening Knife Block

When traditional knives require monthly manual sharpening, the Henckels Self Sharpening Knife Block is redefining the intelligent boundaries of kitchen tools with its black technology of “sharpening while inserting”.
This knife block with a built in automatic sharpening mechanism combines German craftsmanship with modern technology, making every knife placement and removal a process of blade maintenance, completely solving the kitchen pain point of “dull knives being difficult to use”.

1.Core of Cutting Edge Technology: Unveiling the Working Principle of Automatic Sharpening

The core of Henckels self sharpening knife block lies in the “embedded sharpening system” at the bottom of the knife slot. When users take out the knife from the block, the blade passes through two groups of sharpening stones made of tungsten carbide steel, automatically repairing micro damages on the blade edge at a 3 degree tilt angle.
When inserting the knife back, another group of ceramic grinding wheels performs fine grinding, forming a closed loop maintenance of “removal rough grinding, insertion fine grinding”.
This design of “unconscious sharpening” keeps the knife always maintaining more than 90% of its initial sharpness. Laboratory data shows that the sharpness retention time of knives using the self sharpening block is 5 times longer than that of ordinary blocks.
In terms of materials, the sharpening system uses military grade tungsten carbide steel (with a hardness of 8.5 to 9 Mohs), which can withstand more than 100,000 sharpening cycles; the main body of the knife block is made of high density ABS engineering plastic, which is waterproof and moisture proof, and the non slip silicone pad at the bottom ensures stability without shaking during use.Check this site about Self Sharpening Knife to learn more.

2.A Boon for Lazy Cooks: The Experience Revolution from “Having to Sharpen” to “Sharpening Automatically”

For kitchen novices, the self sharpening block completely eliminates the “fear of sharpening”. Traditional sharpening rods require mastering a 45 degree angle and force, while the self sharpening block makes maintenance “zero threshold”.
User tests show that a housewife who has never sharpened a knife can still easily cut tomatoes with the knife after 6 months of using the self sharpening block. This “fool proof maintenance” improves kitchen efficiency by 40%, and there is no need to interrupt the cooking process due to dull knives anymore.


Professional chefs also favor the self sharpening block. A chef from a Chicago restaurant shared: “Our kitchen processes more than 200 portions of ingredients every day. The self sharpening block keeps 8 chef’s knives in the best condition at all times, which is equivalent to saving the labor cost of 1 full time knife sharpener.”

3.Detail Design: When Smart Technology Meets Ergonomics

Henckels has hidden ingenuity in the details of the self sharpening block:
  • Knife Slot Marking: Each knife slot is printed with a knife diagram above to avoid inserting the wrong position and damaging the sharpening system;
  • Safety Lock: A “click” sound will be heard when the knife is inserted to confirm that the sharpening program is activated;
  • Hidden Charging: Some high end models have a built in USB charging port (with a battery life of 6 months) to power the sharpening system.
More considerately, the sharpening system of the self sharpening block can be disassembled and cleaned separately to avoid food residue accumulation-this “easy to maintain” design makes the technology product no longer a “disposable toy” but a kitchen partner that can be used for a long time.

4.Purchase and Use: The Correct Way to Use the Smart Knife Block

  • Applicable Scenarios: Families with a daily cooking time of > 1 hour, back kitchens of small restaurants, cooking teaching institutions;
  • Set Selection: The self sharpening block is usually matched with a 12 to 15 piece knife set, including common tools such as chef’s knives, bread knives, and steak knives;
  • Precautions: It is only suitable for straight bladed knives. Serrated knives (such as bread knives) should not be put into the self sharpening slot to avoid damaging the sharpening system.
When kitchen tools are still competing in “blade hardness”, Henckels has opened the era of “intelligent maintenance” with the self sharpening block. From the manual sharpening stone in the 19th century to the automatic sharpening system in the 21st century,the 290 year technological evolution finally points to one goal: letting cooking return to the fun itself, rather than being troubled by tool problems.
Perhaps as a user commented: “The greatest invention of the self sharpening block is that it makes me forget about sharpening- until one day I used a friend’s dull knife, then I realized how amazing it is.”

5.Must Read for Use: Making the Self Sharpening System Play the Best Effect

  1. Knife Insertion Posture: Pull out vertically when taking the knife, align with the knife slot marking when inserting the knife (the blade faces the direction of the sharpening stone), and confirm the position when hearing the “click” sound;
  2. Applicable Knives: Only straight bladed knives (chef’s knives, paring knives, slicing knives) can be put into the self sharpening slot, and serrated knives (bread knives, steak knives) need to be inserted in the “non self sharpening area” (usually on both sides of the knife block);

6.Data Comparison: Self Sharpening Block vs Traditional Block

ItemsSelf Sharpening BlockTraditional Block + Manual Sharpening
Weekly Sharpening Time0 minutes15 to 20 minutes
Blade Life5 years +2 to 3 years
Cutting Effort SavingAlways saves 40% effortEffort saving decreases after 3 months
Novice Friendliness★★★★★★★☆

Gelmicin: A Mobile Treatment Solution for Facial Allergies and Skin Diseases

Your face is the first thing people notice, but it’s no stranger to problems. Allergies and skin diseases can turn your daily routine into a struggle. Whether it’s the sudden appearance of red rashes, the non-stop itch of skin eruptions, or the persistent battle with acne, these issues can be more than just a cosmetic concen,they can affect your confidence and quality of life. Amidst the sea of treatment options, Gelmicin emerges as a game changer.
Its unique features have made it a go to “mobile treatment solution” for countless Americans dealing with facial skin woes, opening up new pathways to healthier, happier skin. Let’s dive deep into what makes Gelmicin tick, from its scientific underpinnings to real world applications.
gelmicin mexican cream

1.Common Facial Allergies and Skin Diseases

The world of facial skin issues is vast and complex. Allergies and skin diseases don’t discriminate, and they often show up uninvited, triggered by a multitude of factors.

Allergic Reactions

Contact dermatitis is a common culprit. Think about that new face cream you tried or that bouquet of flowers you got too close to. Unsuitable cosmetics, certain skincare products, or exposure to allergens like pollen and dust mites can lead to distinct red patches and small bumps on your face. Along with these come the tell,tale signs of itching and a burning sensation, making it hard to ignore the problem.
Seasonal allergies also take a toll on our skin. As the seasons change, especially in spring and autumn, those with sensitive skin often find themselves facing dryness, flaking, and redness. The shifting climate and environmental factors seem to turn our skin into a battlefield.

Skin Diseases

Acne is a global concern, and it hits close to home for many Americans. According to the World Health Organization, about 80% of teenagers and 30% of adults worldwide have dealt with acne at some point. It’s not just a matter of a few pimples; the root causes involve overactive oil glands, abnormal hair follicle lining, and the growth of Propionibacterium acnes. This combination results in the dreaded comedones, papules, and pustules that can make us feel self conscious.
Seborrheic dermatitis, on the other hand, loves to target areas rich in oil glands, such as the sides of your nose and your forehead. You’ll notice yellowish-red patches covered in oily scales, often accompanied by an annoying itch. Beyond the physical discomfort, these skin issues can have a significant impact on our mental well being, leading to feelings of low self – esteem and anxiety.

2.The Principles and Advantages of Gelmicin in Addressing Facial Problems

So, how does Gelmicin work its magic? Its effectiveness boils down to Gelmicin powerful ingredients and smart mechanism of action.

Ingredients and Mechanism

Gelmicin contains key components like metronidazole and clindamycin, which are superheroes in the fight against skin issues. Metronidazole is excellent at stopping the growth of anaerobic bacteria, particularly Propionibacterium acnes, which is a major player in acne development. Clindamycin, meanwhile, inhibits the production of bacterial proteins, effectively reducing the bacteria’s ability to thrive and causing inflammation to die down.
When it comes to allergies, Gelmicin’s active ingredients act as shields. They block the release of substances like histamine, which are responsible for the redness, swelling, and itching we experience during an allergic reaction. For acne – prone skin, Gelmicin not only battles the bacteria but also helps regulate oil production and speeds up the healing process of damaged skin.

Advantages Over Other Treatments

Gelmicin has several aces up its sleeve compared to other treatments. First, its gel form is a major plus. The lightweight texture means it glides onto your skin effortlessly and gets absorbed quickly. No more thick, greasy creams that leave your face feeling weighed down.It’s perfect for the delicate skin on your face.
Portability is another huge advantage. Its compact size makes it easy to slip into your purse, backpack, or pocket. Whether you’re jet setting across the country, going on a weekend getaway, or just running errands around town, Gelmicin is there when you need it most. It’s like having a personal skin doctor on the move.
And let’s not forget its versatility. Instead of juggling multiple products for different skin problems, Gelmicin can handle a wide range of facial allergies and skin diseases. However, it’s important to note that for severe skin conditions, professional aesthetic medical treatments might still be a better option.

3.The Usage and Practical Effects of Gelmicin

Getting the best results from Gelmicin is all about using it the right way.

How to Use

Start with a clean slate. Wash your face with a gentle facial cleanser to remove dirt, oil, and any impurities. Pat your face dry with a soft towel. Then, take a small amount of Gelmicin gel and apply it evenly to the affected areas. Gently massage it in until it’s fully absorbed. A general rule of thumb is to use it 2 to 3 times a day, but your doctor might recommend a different frequency based on how severe your skin issue is.

Real-World Results

The proof is in the pudding, and the clinical evidence backs up Gelmicin’s effectiveness. A study involving 500 patients showed that after four weeks of using Gelmicin for acne treatment, around 75% of them saw a reduction of over 50% in the number of inflamed blemishes. For contact dermatitis, most patients reported significant relief from itching and redness within just 3 to 5 days.
These aren’t just numbers on a page,real people have experienced real life changes. Take Emily, for example. As an office worker who had to wear a mask all day, she developed painful contact dermatitis with intense redness and itching. But after a few days of using Gelmicin, the redness faded away, and the itching subsided. Then there’s Jake, a student who had been struggling with acne for years. Consistent use of Gelmicin led to a noticeable decrease in comedones and pustules, giving him back his confidence.
gelmicin cream for sale

4.Precautions for Using Gelmicin

While Gelmicin is a great ally in the fight against skin problems, it’s important to use it with care.

Before You Start

Everyone’s skin is unique, so it’s crucial to do a patch test first. Apply a small amount of Gelmicin behind your ear or on the inside of your wrist and wait 24 hours. If there’s no sign of redness, itching, or swelling, it’s likely safe to use on your face.

During Use

Be careful around sensitive areas. Avoid getting Gelmicin in your eyes, mouth, or other mucous membranes. If you do accidentally get it in these areas, rinse immediately with plenty of water.

Who Should Avoid It

Not everyone can use Gelmicin. Pregnant women, breastfeeding mothers, and those who are allergic to metronidazole, clindamycin, or other ingredients in the product should steer clear. People with large areas of damaged or ulcerated skin should also avoid it to prevent further irritation or infection.
If your skin condition doesn’t improve or gets worse while using Gelmicin, or if you experience severe allergic reactions like trouble breathing or facial swelling, stop using it right away and seek medical help. And whatever you do, don’t try to extend the usage time or increase the dosage on your own. If long – term use is needed, always consult your doctor first.
Facial allergies and skin diseases may seem like an uphill battle, but Gelmicin offers a convenient and effective solution. By understanding how to use it properly and following the precautions, and combining it with good skincare habits, you can take control of your skin health. If you’ve been struggling with facial skin problems, don’t hesitate to talk to your doctor about giving Gelmicin a try. You might just be one step away from the clear, healthy skin you’ve been dreaming of.

Deddy Bears Plush in Coffin: Cute, Creepy, and Emotionally Dead Inside

When most people think of plush toys, they picture sunshine, rainbows, cozy vibes, and childhood comfort. Teddy bears are supposed to be symbols of warmth and innocence — the fluffy friends we clung to during stormy nights and long road trips.
But what if your stuffed bear had… a death wish?
Welcome to the eerie-yet-irresistible universe of Deddy Bears Plush in Coffin — a twisted blend of snuggles and nightmares, where plush meets goth, and every bear comes with its own coffin. These plushies are soft to hug, haunting to look at, and guaranteed to become the most iconic part of your collection.

So, What Are Deddy Bears?

Deddy Bears are a unique plush toy series that blend horror and cuteness in the most bizarrely brilliant way. Imagine a teddy bear with zombie eyes, a stitched-up heart, fangs like a vampire, or a spooky little smile that screams “I see ghosts.” Each bear is carefully “laid to rest” inside a miniature coffin-shaped plastic box, often complete with a viewing window and creepy graveyard props for the full funeral fantasy.
These plushies stand out because:
  • They’re spooky but sweet: A mix of creepy aesthetics and adorable charm.
  • Perfect for Halloween—or all year round if you’re living that goth life.
  • Collector gold: Their rare designs and packaging make them highly sought-after.
  • Alt-culture approved: They represent individuality and non-mainstream vibes.

Why Are They So Popular?

If you’ve seen them on TikTok or pinned them to your “dark aesthetic” Pinterest board, you already get the hype. Here’s what makes Deddy Bears blow up online:cute deddy
  • Each one tells a creepy story — no two designs are alike, and every detail adds to their backstory.
  • That coffin packaging is everything — it’s not just packaging; it’s a theatrical unboxing experience.
  • Soft, squishy comfort — beneath the eerie exterior, it’s still a plushie. Cry into it if you need to, we won’t judge.
  • Subculture staple — goths, alt kids, horror fans, Halloween diehards… this is their love language.
  • The ultimate shock gift — it’s giving “WTF is this?” in the best possible way.

Who Needs One?

Let’s be real — everyone could use a plushie that looks like it clawed its way out of the underworld. But if you’re any of the following, this bear was made for you:
  • Alt/goth teens & adults (obvi)
  • Rare plushie collectors
  • Year-round Halloween lovers
  • Friends who hate basic gifts
  • Someone going through a breakup (a plushie in a coffin just hits different)

Sizes, Styles & What to Expect

deddy bears plush

  • Most Deddy Bears are 7–10 inches tall — perfectly sized for cuddles or creepy decor
  • Colors include black, grey, blood red, purple, and bone white
  • Designs feature vampire bears, zombie bears, stitched hearts, cracked eyes, and more
  • Many are limited edition and some even glow in the dark

Where to Buy

You won’t spot these in your average toy aisle — which only adds to their cool factor. Try the spot instead: https://thededdybears.com
Pro Tip: No coffin box? It’s probably a knockoff. Don’t get ghosted.

Why We Love Them

Deddy Bears aren’t just cute — they’re weirdly healing. When you’re heartbroken, moody, or just have a very dark sense of humor, hugging something that looks like it died five days ago is… comforting in a strange way.
Because let’s be honest — a regular teddy bear just won’t do when your soul wears fishnets and stomps around in Doc Martens.

Style It Your Way: Aesthetic Vibes

Shelf it next to your vinyl records and tarot cards for full dark academia
Add fairy lights to the coffin for max TikTok mood
Use it in your Insta photoshoots — creepy-cute is trending
Add it to your vanity or gaming setup as the ultimate vibe booster
Place it on your Halloween altar (or year-round altar — we don’t judge)

Creepy, Cuddly, and Totally Collectible

Deddy Bears Plush in Coffin aren’t just toys — they’re a mood. They’re the plushie version of emotional support cryptids(Stuffed Animal as a Source of Comfort), perfect for the misfits, the goth romantics, the Halloween-obsessed, and the beautifully broken.

Adopt your dead bear. Give it a name. Light a candle. Or just hold it tight while blasting My Chemical Romance.
“It’s not dead. It’s just different.” 

QB54 Football Game: From the Backyard to the Beach, Ultimate All-in-One Solution

In the world of outdoor sports gear, the QB54 Football Game is sparking a lightweight revolution, thanks to its bold, innovative design. Tailored for today’s fast-paced, on-the-go lifestyle, this American football game set has quickly become a standout favorite among outdoor lovers across the U.S. With its military-grade portability and all-terrain versatility, QB54 is turning heads on forums, in campgrounds, and on social media alike.

QB54 Football Game From Packed to Play in 30 Seconds Flat

Most outdoor game sets fall into the trap of being either portable or sturdy—but not both. QB54 breaks the mold with patented three-stage folding technology:
  • Ultra-Compact: Folds down to just 32×18×12 cm—small enough to fit in the side pocket of a carry-on suitcase. Built with aviation-grade aluminum alloy, the entire kit weighs just 4.8 kg (including the carry bag). In addition, QB54 also offers an optional Scoring Kit Bundle that can be purchased separately. For more details, please refer to the website qb54.net.
  • Fast Setup: Magnetic snap connectors and spring-loaded supports make assembly a breeze—even first-timers can get it up and running in under 30 seconds.
  • Tidy Storage: The goal net stashes neatly into the back of the chair, avoiding annoying tangles. The included football also has a built-in slot for the air valve.

Game Meets Chair: Efficiency, Redefined

Unlike most outdoor gear that just takes up space when you’re not using it, QB54’s dual-purpose design makes it just as functional when the game ends:
  • High-Performance Seating: Made with 600D tear-resistant Oxford fabric, each QB54 football game QB54 football gamechair holds up to 330 lbs (150 kg). Ergonomic lumbar support helps reduce fatigue by up to 42% after three hours of use which adopts an ergonomic structural design, providing comfortable lumbar support and a stress-relieving experience for long-term use, making it suitable for prolonged outdoor use. Built-in cup holders fit everything from 12 oz cans to 24 oz bottles, and side mesh pockets keep phones and sunglasses handy.
  • Smooth Transitions: When the game ends, just collapse the net—your seat locks automatically into chair mode. Ready to play again? Dual safety locks hold everything firm and secure.

QB54 Football Game All-Terrain Ready: Sand, Grass, Snow—No Problemqb54 game set

Where most outdoor games need a perfect setup, QB54 excels in real-world environments:
  • QB54 Terrain Adaptability: Six adjustable weight compartments in the base keep it steady in wind or on slopes. A 360° rotating base adjusts to uneven ground (slopes from 5°–20°).
  • Rugged Materials: The QB54 football game goal net is made from Kevlar-grade fiber, offering 300% more tear resistance. The frame’s protective coating passed the ASTM B117 2,000-hour salt spray corrosion test—meaning it can withstand the elements, no problem.

QB54 Football Game Built for the Mobile Lifestyleqb54 game set

For weekend warriors, tailgate pros, and digital nomads alike, QB54 delivers where it counts:
  • Smart Use of Space: One kit = 1 game set + 2 sturdy chairs + storage bag. Maximizes car space usage by up to 65% compared to traditional gear.
  • Time-Saving Setup: From trunk to touchdown in 90 seconds or less—ideal for the instant-gratification generation.
  • Social-Media-Ready: The #QB54 Challenge has racked up over 230 million views on Instagram, turning it into a certified viral hit at tailgate parties, campsites, and music festivals.

 When Outdoor Gear Learns to Evolve

QB54’s meteoric rise is no fluke. It’s the answer to three of the biggest tensions in outdoor sports: portability vs. performance, pro-level function vs. casual play, and gear vs. environment. It proves that truly great gear doesn’t demand you adapt to it—it adapts to you.
Whether you’re a city dweller seeking efficient fun or an adventurer chasing your next thrill, QB54 earns its place as a top-tier essential in your outdoor arsenal.

The Difference Between Fully Automatic French Fries Line and Semi-automatic French Fries Line

From potatoes to golden and crispy French fries, what kind of delicious journey has it gone through? Potatoes grow underground, and cleaning is particularly important for the food hygiene of French fries. The brush cleaning machine can remove the potato skin while thoroughly cleaning the potatoes; the peeled potatoes are cut into potato strips of uniform specifications by the multi-functional vegetable cutter; the potato strips are rich in starch and are easy to change color when exposed to air. The blanching in the blanching machine plays a role in color protection; the air knife air dryer can blow away the moisture on the surface of the potato strips; frying is the key to the entire French fries production. The fully automatic constant temperature control of the continuous fryer makes the fried French fries golden in color and crispy in taste; after de-oiling by the vibration oil drainer and cooling by the air dryer; the quick freezing technology is the core of the entire quick-frozen French fries production line. Through the quick freezing of the quick freezer, the French fries can be brought to supermarkets through the cold chain and into thousands of households. Clink this link to find more types of French fries line.

Fully Automatic French Fries Line VS. Semi-Automatic French Fries Line

1. Greater output

The machine of the fully automatic French fries production line works closely together, and the processing efficiency is rapidly improved. In just ten minutes, you can see that a batch of potatoes have been processed into French fries, and only the quick freezing process remains.

2. Less labor

The fully automatic French fries production line only requires a small amount of labor and technical engineers. You only need to observe the orderly connection of each device and pre-set the blanching, frying and quick freezing time.

3. Safe food quality

For semi-automatic production lines, some processes are still completed manually. Human participation will lead to some uncontrollable factors, which will affect food hygiene and safety. The fully automatic production line can avoid the above situation.

4. More investment

For production lines with the same output, the investment in fully automatic production lines is relatively large. However, after a period of operation, the saved labor wages and increased production income can effectively make up for the extra investment.

Whether to choose a fully automatic French fries production line or a semi-automatic French fries production line mainly depends on investment planning and business expectations. However, whether it is fully automatic or semi-automatic, our company can propose targeted processing solutions according to your processing needs.…

Chicken Nugget Production Line Investment Strategy

With the accelerated pace of life and the increasing demand of consumers for convenient and delicious food, the market demand for fast food such as chicken nuggets continues to grow. Investing in chicken nugget production lines has become the focus of many entrepreneurs. However, before investing, you need to consider many aspects comprehensively to ensure the success and return of the investment. Here are some key points to help you.

Market Demand Analysis

First of all, in-depth market research is indispensable. Understanding the chicken nugget consumption habits, competitive situation and potential growth space in the local and target markets will help to accurately position products and meet consumer needs. At the same time, paying attention to industry trends and policy orientations, such as the country’s support policies for green and organic foods and machine, can add competitiveness to the project.

Equipment Selection and Technical Considerations

The core of the chicken nugget production line lies in the equipment. It is crucial to choose efficient, automated and easy-to-maintain equipment. From raw material processing, cutting, marinating to frying, cooling and packaging, the equipment in each link should have stable performance and efficient production capacity. At the same time, consider introducing intelligent control systems to monitor the production process in real time to ensure stable product quality and improve production efficiency.Clink chickennuggetproductionline.com to find more information.

Food Safety and Hygiene

Food safety is the lifeline of food production enterprises. When investing in a chicken nugget production line, it is necessary to strictly abide by national food safety regulations and establish a sound food safety management system. From raw material procurement, processing to finished product inspection, every link should be strictly controlled to ensure that the product meets safety standards. In addition, regular cleaning and maintenance of equipment and maintaining the hygiene of the production environment are also important links that cannot be ignored. Clink this link to find more.

Cost Control and Benefit Analysis

Cost control is the key to improving profitability. Before investing, the production cost should be analyzed in detail, including equipment purchase, raw material procurement, labor costs, energy consumption, etc. At the same time, a break-even point analysis should be conducted to predict the cost and profit situation under different outputs to provide a basis for investment decisions. In addition, pay attention to changes in market factors such as feed prices and chicken selling prices, and flexibly adjust production strategies to cope with market fluctuations.

Team Building and Management

A professional team is the guarantee of project success. When investing in a chicken nugget production line, a team with rich experience and technical capabilities should be formed, covering production, management, sales and other aspects. Through regular training and team building activities, team cohesion and execution can be improved to ensure the smooth progress of the project.

Marketing and Brand Building

Finally, effective marketing and brand building are the key to increasing product awareness and market share. By combining online and offline methods, broaden sales channels and strengthen interaction with consumers. At the same time, focus on brand building and word-of-mouth communication, create an influential brand image, and lay a solid foundation for the long-term development of the company.

In short, investing in a chicken nugget production line is a complex and systematic project. Only by comprehensively considering market demand, equipment selection, food safety, cost control, team building, and marketing can the success and sustainable development of the project be ensured. I hope the above suggestions can provide a useful reference for your investment journey.…

7 Causes of Itchy Skin You May Not Have Known About

Looking for the source of your itchy skin? You may be surprised to find that the answer is right under your nose! (or, more accurately, on your head).

Here are seven causes of itchy skin you may not have known about. Read on to learn more.

– Chemical sensitivities

You’re not alone if you’ve ever wondered why your skin, like your scalp or your body part, seems to react badly to everything. In fact, you may be one of the many people who suffer from chemical sensitivities.

Chemical sensitivities occur when your body has an adverse reaction to a substance that is otherwise harmless. This can manifest itself in various ways, including rashes, hives, itching, and swelling.

It can also cause difficulty breathing, nausea, and dizziness. If you think you may have a chemical sensitivity, avoid using products that contain the offending substance and see a doctor for further testing.

– Food allergies

You may be surprised to learn that food allergies can cause itchy skin. If you’re feeling itchy all over and you can’t figure out why it might be time to take a closer look at your diet.

Many people don’t realize that they’re allergic to certain foods, and as a result, they continue to eat them, unaware of their damage to their skin. If you have a food allergy, your body reacts to certain proteins in the food you eat.

Food allergies can cause many symptoms, including rashes, hives, and itching. If you suspect that you might be allergic to something you’re eating, talk to your doctor about getting tested.

– Pollen allergies

Hay fever, also known as allergic rhinitis, is a condition that affects millions of people each year. symptoms include itchy eyes, runny nose, sneezing, and congestion. While there is no cure for hay fever, there are several ways to manage the symptoms and enjoy a happy, sneeze-free life.

If you’re someone who suffers from hay fever, you know that the key to surviving allergy season is to be prepared. Stock up on antihistamines, keep a box of tissues handy at all times and invest in a good pair of sunglasses to protect your eyes from the pollen floating around in the air.

Avoiding potential triggers, such as trees, grasses, and dust, is also important. If you can’t seem to escape your allergies, talk to your doctor about prescription options that can provide relief.

With a little planning and preparation, you can make it through hay fever season without too much discomfort. So take a deep breath, grab your tissue box, and enjoy being outdoors again!

– Pet dander allergies

Do you love animals but can’t seem to keep your allergies under control when you’re around them? If so, you may be allergic to pet dander.

Pet dander is a very fine powder that is shed by animals with fur or feathers. It is made up of skin cells, hair, and other proteins that can cause an allergic reaction in some people. If you’re allergic to pet dander, the best thing to do is to avoid contact with animals as much as possible.

However, if you can’t bear to be without a furry friend, there are a few things you can do to reduce your exposure to pet dander. For example, you can keep your pet out of your bedroom and off of upholstered furniture.

You can also vacuum regularly and use an air purifier to remove pet dander from the air. By taking these simple steps, you can enjoy the companionship of a pet without suffering from allergies.

– Dry skin

You know how irritating it can be if you’ve ever had dry skin. The constant itchiness, the flakiness, the way makeup just doesn’t seem to go on right…

It’s enough to drive anyone up the wall. And yet, despite how common it is, dry skin is still somewhat of a mystery. Why does it happen? What can you do about it?

Dry skin occurs when the skin is unable to retain moisture. This can be due to several

factors, including weather, age, and harsh cleansing products.

It’s also more common in people with certain medical conditions, such as eczema and psoriasis. When the skin is dry, it becomes cracked and irritated, leading to further discomfort.

Fortunately, you can do a few things to combat dry skin. For one, ensure you’re hydrated by drinking plenty of water throughout the day. You should also avoid hot showers and bathe only in lukewarm water.

After bathing, be sure to apply a moisturizer within three minutes to help lock in moisture. In addition, try to use milder soaps and cleansers, as these are less likely to strip away natural oils. Following these simple tips can help keep your dry skin under control.

– Eczema

If you’ve ever had eczema, you know that it’s not just a skin condition – it’s chronic pain in the a*s. Seriously, eczema is the worst. It’s itchy, dry, and inflamed and can appear anywhere on your body.

The most common places are the face, hands, and feet, but I’ve had it on my legs, back, and even in my hair. It’s not fun. And to make matters worse, there is no cure for eczema.

You can best manage the symptoms and hope for the best. But don’t worry – you’re not alone. Eczema is a very common condition, and there are plenty of people out there who understand what you’re going through.

So hang in there and don’t scratch too hard!

– Psoriasis

Anyone who’s ever had a bad case of psoriasis knows that it’s more than just a skin condition – it’s a total pain in the a*s.

Not only does it make your skin look like you have some weird scales all over, but it also tends to be itchy. And if you’re unlucky enough to get it on your scalp, you can forget about having a good hair day anytime soon.

But while psoriasis may not be the most fun thing in the world, there are worse things out there. And besides, once you find the right treatment, it’s not so bad.

So if you’ve got a case of psoriasis, don’t panic – you’ll be just fine.

How to Deal with Chronic Itching?

sources of tichy skin

If you suffer from chronic itching, you know how frustrating and even painful it can be. The constant scratching can lead to skin irritation, infection, and even scarring. Not to mention, it’s just really darn annoying.

Fortunately, you can do a few things to deal with chronic itching. For one, try to identify the cause of your itch. This can be anything from a skin condition to an allergy.

Once you know what’s causing the itch, you can take steps to treat it. For example, if it’s due to dry skin, you can use a moisturizer. If it’s due to an allergy, you can take an antihistamine.

In addition, try to avoid scratching as much as possible. This can be difficult, but it’s important. Scratching will only make the itch worse and can lead to further irritation.

If you are scratching a lot, try wearing gloves or covering the itchy area with a bandage.…